Creative Actions Panel – Documentation & Updates
The information on this page is being fleshed out over time with instructions being added in video and written format.
If you need assistance or have questions regarding the panel in the meantime, please post your query in the PMC forum here.
How to install the panel
Please follow the instructions provided on the download page here.
How to use the panel
The panel is divided into two main sections.
1: Creative Adjustments
2: Textures
Let’s break it down a little.
1: Creative Adjustments
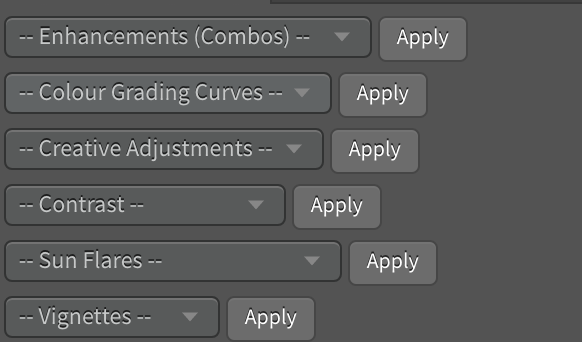
There are 6 dropdown menus, each containing various types of adjustments,
Simply select an option from one of the dropdown menus and click the corresponding Apply button to add it to your image.
You can add as many different effects and adjustments to your image as you like and build a totally unique and customised look and feel for your photos.
Most of the adjustments come in the form of Photoshop adjustment layers so you are free to tweak and fine tune their settings to fit your image perfectly after adding them.
Enhancements (Combos)
Options from this menu are grouped collections and combinations of adjustments from the other 5 dropdowns.
Each one has been designed to give a specific finished look and feel to your photo in a single click.
Colour Grading Curves
The creative adjustments under this dropdown menu are each a meticulously configured curves adjustment layer that adds a particular colour grading to your image. Use them near the beginning of your workflow to set the tone for your image, then continue on adding adjustments from the following dropdown menus to build upon it.
Creative Adjustments
The creative adjustments menu provides a number of other types of Photoshop adjustment layers (gradient maps, colour fill etc), to add a range of creative colour effects to your photos.
Contrast
Simply put, this menu provides a number of one-click contrast adjustments you can add to your image. Of particular note, the “Shadow Dehaze” and “Black Point Recovery” adjustments have been provided to counteract some of the hazy effects that the previous enhancements and adjustments may have added. If at any time you like what a particular adjustment does with the colours but you don’t want the hazy effect that comes along with it, use one of these contrast options.
Sun Flares
The sun flares are pixel based layers that give the appearance of bright hazy light leaking into the image from a sun that’s just out of frame, or can be placed directly on top of the sun inside the frame to give it a soft hazy look and feel.
Each flare has a regular and large version, so be sure to experiment and see which one fits your image best.
Vignettes
A small collection of variously styled vignettes that darken the edges of an image to draw attention towards the centre. Use sparingly 🙂
2: Textures
Access the textures part of the panel by clicking the Textures button to reveal the following:
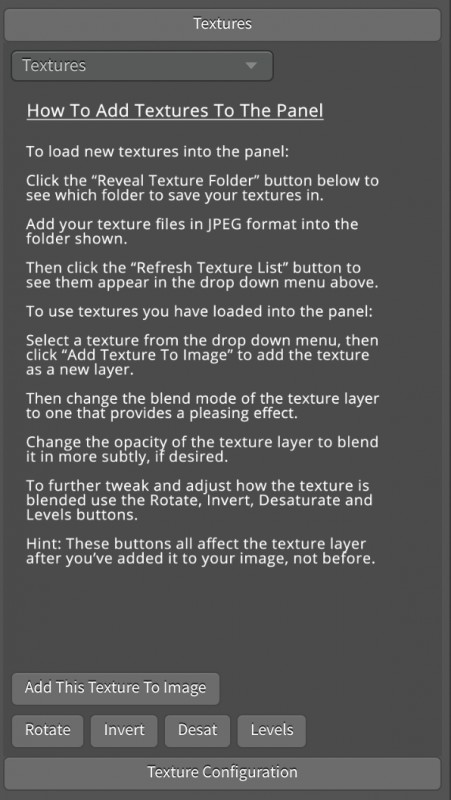
Without any texture selected in the dropdown, some basic instructions will be shown about how to install and use textures.
First Time Texture Setup (IMPORTANT)
The first time you use the panels texturing functionality you’ll need to set up the folder where you’ll store all your textures.
To do this, click the “Texture Configuration” button to reveal the “Reveal Texture Folder” button beneath.
When pressed, the “Reveal Texture Folder” button will pop up with a message telling you the name and location of the folder where you need to install your textures.
However – the first time you click the button, Photoshop will attempt to create that folder for you. If all is well, then you should find a new folder named “Creative Panel Textures” in your My Documents (PC) / Documents (Mac) folder.
Simply add texture files in JPEG format into that folder, then click the “refresh texture list” button to make them appear in the Textures dropdown menu.
Adding Textures To Your Photos
Once you’ve loaded a handful of textures into the correct folder noted above, simply select one from the Textures dropdown list, then click the “Add This Texture To Image” button.
Once the texture has been added as a new layer on top of your image, change that layers blend mode to blend it in. Experiment with various blend modes and the layers opacity to achieve the perfect blend.
You can also use one of the 4 buttoms “Rotate” “Invert” Desat” “Levels” to further fine-tune how the texture appears.
(Video demonstrating this is to come soon)
Frequently Asked Questions
What Version Of Photoshop Do I Need?
The Creative Actions Panel is only compatible with Photoshop CC. It is not designed to work with any other PS version. This is communicated on the order form but you may have missed it before placing your order. If you have purchased the panel are using a non-CC version of PS, please contact me for a full refund on the panel or to exchange it for another product or course.
I’m Experiencing Problems Installing The Panel
The process for installing the panel on Photoshop CC is the same as for my luminosity masking panel.
Please follow the troubleshooting steps on this page of the luminosity masking panels documentation as your first step in resolving installation issues (99% of cases are resolved by following the steps on that page).
What Textures Do I Use?
Actual textures are not included with the panel. For the most creative control over your images, you’ll want to create your own textures and add them to the panel.
However, there are PLENTY of great textures to be found online which are free to use, thanks to the generosity of the contributing photographers.
I recommend signing up for a free account at Pixabay.com (click here) and browsing the available textures there to get started.