January 1, 2026

I’m seeing more doom and gloom videos, articles, adverts all asking things like:

“Will AI destroy photography?”

“Is Photography DEAD?”

“Will AI REPLACE PHOTOGRAPHERS?”

And on it goes…

But as we look ahead to 2026 which is upon us in mere hours, allow me to share my reasons why it will do NOTHING of the sort.

Technical reasons why AI won’t replace photographers/photography

1) The image quality is bad and low res.

2) It never really listens to what you want. Create a great image once? ok. Do something similar next time – good luck.

The technical issues will eventually get fixed. But even then, it won’t matter because of the real reasons AI won’t replace photography.

The REAL reasons why AI won’t replace photographers/photography

It all boils down to this.

For the VAST majority of people who read my emails and take my courses etc, ask yourself one question and you’ll discover the answer yourself.

Why do you do photography?

It’s not because you want to have a completely fabricated hyper-realistic rendition of a fantasy scene that doesn’t exist. Who’s ever going to stick that on the wall, or create an album to give to a family member at Christmas?

It’s because you take photos for yourself. Or to share.

To capture a moment in your life.

To tell the story of a hike you went on through the mountains.

To re-live that AMAZING sunset you were lucky enough to witness.

To push your creative boundaries and make something that contains YOU.

To give you a reason to stay active and get up and out there.

To connect with friends.

Because you ENJOY being out in nature, seeing it in ways only photography allows you to see.

Or because you simply enjoy the process of improving your skills, bettering yourself, and producing a piece of work you can be proud of.

When all said and done, AI cannot replace your reasons and it can’t create what you can create.

Cheers

Steve

Read More

July 14, 2025

You’ve probably heard the idea that to quickly get decent focus in a landscape photo, focus one third of the way into the scene.

But there’s a problem with that which can leave your foreground soft.

And it’s easy to miss until you get back home and zoom in on your images in Photoshop, when it becomes painfully clear.

The problem is that focusing one third of the way into the scene, you might still be focusing on something that’s too far away for the depth of field to fully cover the foreground.

Let’s say the furthest thing in your scene is a mile away…

Focusing one third of the way into that scene would mean focusing on something a third of a mile away…

And if you have anything remotely close to the camera, chances are that’s gonna fall outside of the depth of field.

So here’s what I do, and what I encourage you to try:

It’s a simple shift, but makes a big difference.

Instead of focusing one third into a landscape scene…

Focus one third into the foreground.

Bringing the focus point that much further forward brings those closer objects more into focus, and the far-point of the depth of field is probably still “infinity”.

Especially when shooting wide angle.

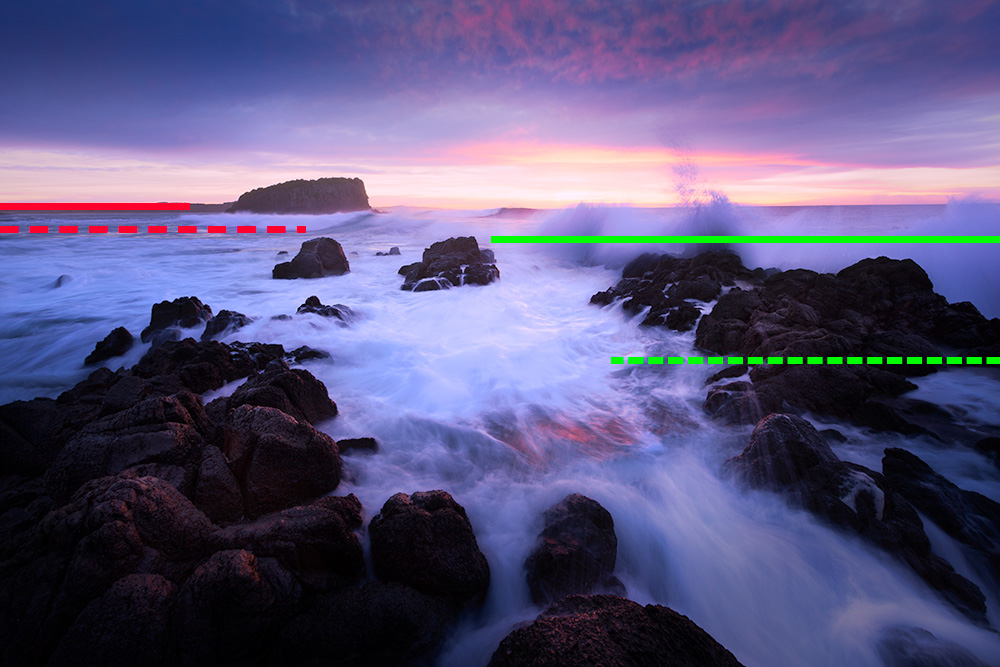
See this image below:

Red Line – Background of the scene

Red Dotted Line – One third “into” the scene

Green Line – Where the foreground ends

Green Dotted Line – One third into the foreground

Thing is, this is what I consider an “80/20” technique…

Something that will work most of the time for the least amount of effort.

But what about those times when you’re not shooting wide angle, or you’re not shooting a “typical” foreground/background composition?

That’s when you’ll want to dig a little deeper and go beyond the 80/20.

You can learn all about this in my Landscape Capture Masterclass.

Read More

March 3, 2021

**_ Timestamps to key lessons in description below _**

Download the PDF version of this tutorial here: https://postprocessingmastery.com/intro-to-curves

This Curves Photoshop tutorial is for beginners who are looking to get to grips with using Curves in their Photoshop workflow.

You’ll learn:

2:44 – HOW TO ADD A CURVES ADJUSTMENT LAYER TO YOUR IMAGE
4:58 – FUNDAMENTAL CURVES CONCEPTS
8:02 – CREATING AN S-CURVE TO INCREASE IMAGE CONTRAST
11:57 – ALTERING THE BLACK AND WHITE POINTS OF THE CURVE
15:40 – ADJUSTING, ALTERING AND RESETTING A CURVES ADJUSTMENT LAYER
17:30 – AUTO CURVES
21:06 – ADJUSTING THE CURVE IN INDIVIDUAL COLOUR CHANNELS
23:01 – EYEDROPPERS
27:20 – USEFUL CURVES ADJUSTMENT EXAMPLES

Download the PDF version of this tutorial here: https://postprocessingmastery.com/intro-to-curves

Video originally hosted at: https://youtu.be/X0DG6WxCeS8

Read More

March 1, 2021

https://www.youtube.com/watch?v=t90Jmsmos0Y

In this video you’re going to learn how the Fake Grad Filter technique works using my Luminosity Masking Panel.

– Download the Luminosity Masking Panel *
https://postprocessingmastery.com/luminosity-panel

The Fake Grad Filter technique is something that essentially eliminates the need for using grad filters in front of your lens. It works by taking two bracketed exposures instead, and then running through the process I’m about to show you.

– Subscribe To My Channel *
https://postprocessingmastery.com/subscribeyoutube

– Download my FREE PDF Guide *
An Introduction to Luminosity Masking: https://postprocessingmastery.com/intro-to-lm

– More Photoshop Courses *
https://postprocessingmastery.com/go

– Get 1-on-1 Photography Coaching *
https://postprocessingmastery.com/coaching

– Download the FREE 6 Stage Workflow Cheat Sheet *
https://postprocessingmastery.com/workflowcheatsheet

#luminositymaskingpanel #postprocessingmastery

Originally Published here: https://youtu.be/t90Jmsmos0Y

Read More

February 27, 2021

Exposure blending with luminosity masks – Learn how to blend 3 bracketed exposures in Photoshop using my Luminosity Masking Panel.

– Download the Luminosity Masking Panel *
https://postprocessingmastery.com/luminosity-panel

This full landscape editing walkthrough shows my end to end process for creating a natural-looking HDR image using the photoshop actions panel that I personally designed and coded.

If you want to take the otherwise complicated process of exposure blending with luminosity masks and see how quick and easy it can be, then watch all the way to the end of this video because you’ll see how the panel makes your entire workflow easier than ever.

If you don’t have the panel, then you’ll also get a lot out of this walkthrough because you can still do these luminosity masking processes manually, building masks and selections from scratch like how I teach in a number of other videos and courses.

#postprocessingmastery #luminositymaskingtips

Originally Published Here: https://youtu.be/7R1z4c3ZgGY

Read More