Today we’re talking about how to shoot light trail photos. It’s a quick read because the steps are really quite simple once you know them.
So let’s dig in!
What are light trails?
“Light trails” are what we call the appearance of lights streaking through an image, such as the lights from a moving car or the stars in the sky.
The effect happens when some kind of light source moves across your cameras field of view while the shutter is open.
It’s a really cool effect and fun to create too. Here are some tips to get you started.
How to capture light trails
What you’ll need: Your camera and your tripod. (Not too bad so far, right? 🙂 )
You’ll need to capture a long exposure in camera to create the streaking light trail effect, therefore a tripod is essential to eliminate any kind of camera shake.
So once your camera and tripod are set up in place, you are ready to take your first test shot.
Best exposure settings for light trail photos
There’s no single answer to the “best” exposure length to use because there are a few varying factors that come into play.
However, if you’re shooting an urban night scene (like the first image below) and capturing the lights from moving cars then a good place to start will be roughly:
- Aperture: f11-f16
- ISO: 100
- Shutter speed: 6-10 Seconds
(I recommend setting these in your cameras manual mode so you have full control over the exposure.)
Fire off a couple of test shots and adjust your exposure time from there depending on how bright the image comes out and whether you need to increase or decrease the length of the trails.
Having established these “starting point” camera settings, there are some rules of thumb you can follow to fine tune your shot.
Rules of thumb for capturing light trails:
The faster the light moves across your view, the shorter exposure you’ll need.
The slower the light moves across your view, the longer exposure you’ll need.
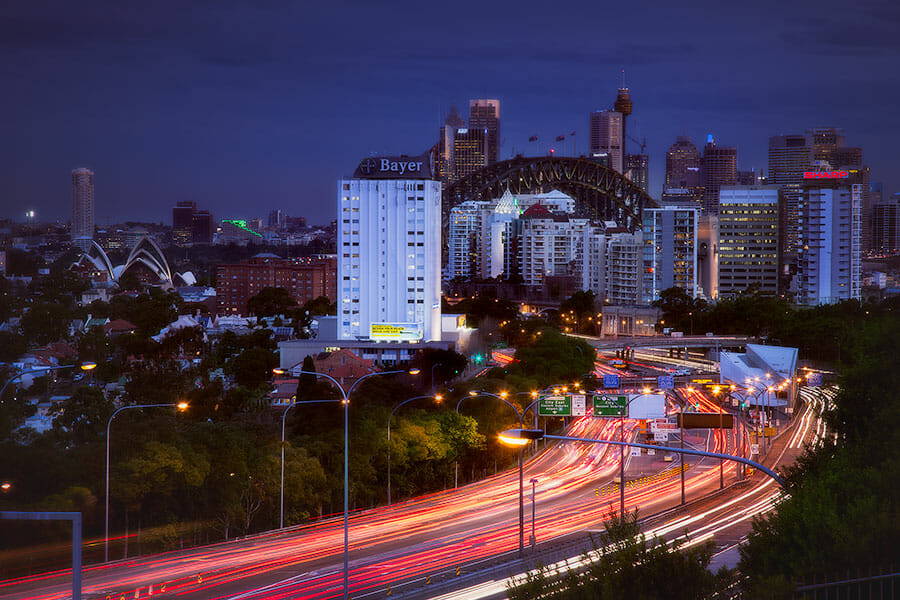
For example, the cars in this photo are travelling quite a distance through the frame relatively quickly. So the exposure time for this image was only 6 seconds.
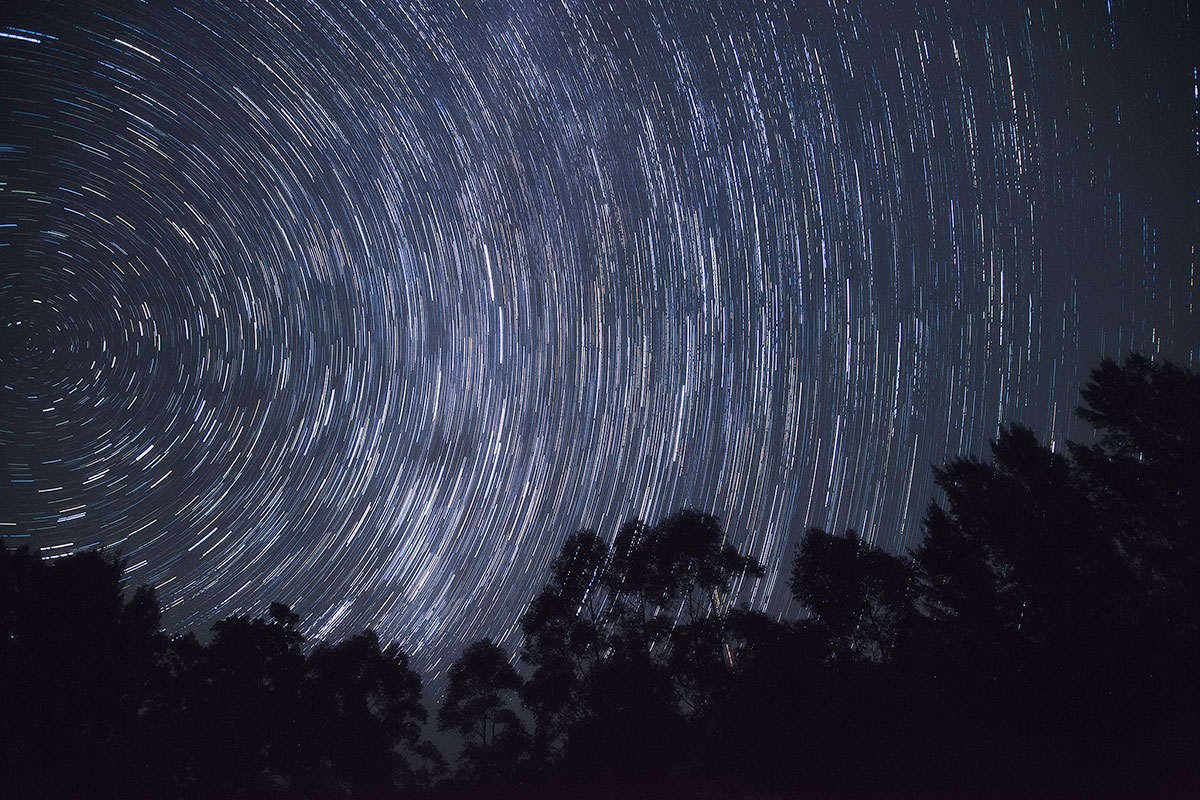
The stars in this photo are moving so slowly across the frame (imperceptibly so to the naked eye) that it required an exposure time of 30 minutes to capture them streaking across the sky like this.
Important Tip
Another factor in how impressive your light trail photos will appear is the number of streaking lights in your scene.
I remember years ago when I first tried shooting the light trails from cars at night for the first time. I went to a “busy” intersection in my small home town of Felixstowe (UK) and set everything up.
Then I waited.
And waited.
Then a car approached, so I clicked the shutter and waited a few seconds. Then I reviewed my masterpiece on the cameras LCD screen.
Huge disappointment! I learned right then and there that a single car’s streaking tail lights across a boring old set of traffic lights didn’t make for an inspiring image! lol
Unfortunately for me that night the cars were few and far between. So whilst I technically got to experiment with the idea, the images were pretty boring.
Anyway, that was a long way of saying that the more lights (in this case, cars) in your scene, the cooler the final image will be.
But it can go the other way too.
If there are too many lights (cars) then your shot may become an overexposed mess!
In which case, simply shortening your exposure time will reduce the negative effect of too many cars.
In summary, a good light trail photo is a balancing act.
You’ll want to constantly experiment, adjusting your exposure time to dial in the perfect amount of “streaking” that appears in your image.
If the trails are a bit thin and lacklustre, increase the exposure time to capture more of them.
If the trails are turning into a big overexposed blob, shorten the exposure time to give them more definition.
Remember, it’s not about how fast the lights are moving. It’s about how fast they’re moving across your frame.
Next Steps
If you’ve never tried it before, the tips shared in this blog post will get you up and running photographing some awesome light trail images.
Or if you want to go next level, there’s a full guide on how to shoot star trails inside the members area of Photo Mastery Club. Click here to join now.
Or if you’ve got any images or tips for shooting light trails that you want to share with your fellow readers. Feel free to add them to the comments below!
